
Posted By Ravi Patel on Monday, 13 May 2013

Today i am share this knowlege for you how can add post views plugin to blogger, post views plugin should be blogger show right uperside blogger post above it nice views and all post through begain one or one define different views in different post. easily create and install this code not worry server problem and any one. that was with a free like firebase this service to easily create a dynamic drive it data-driven no need requirement mean space no required GB space and etc.
Firebase was launched in April 2012. you can here and provide blogger 10GB Free Brnadwidth and 5GB free storage this is really enough for bloggers.
Note: This plugin will only increment its count value when you visit individual and any one but not refreshing On the Homepage!
Create Firebase Account
Sign up free account benefit of store your database of your post views.
Once upon fill all your correct details and submitted it create account.
Create a Firebase Database
1. At the bottom side show in box you will get following the create box.
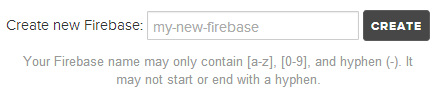
2. Insert Your blog name text field. in my case i am inserted MyBloggersTricks.
3. Press Create Button. i think press the button firebase will be create as:
4. Note Down your firebase URL any text editor like use notepad so need will in my tutorial.
Installing Post views Plugin
1. Go Blogger Login Dashboard
2. Backup your template before any changes
3. Click Edit HTML
4. Press Ctrl+F and find ]]>
5. Just Paste it above following CSS
/*-------- Post Views ----------*/
#views-container {
width: 85px;
float: right;
}.mbtloading {
background: url('https://blogger.googleusercontent.com/img/b/R29vZ2xl/AVvXsEhXnLzDTrNOHpxEcMeU8BazBtVO1cfU9oUN2yMrAgbBFjr0_-YQ_OZoUipzWScSrxT1cNGGrJDeyIfCpIpFTPW5sB-oJ8GcZYbARbkydqqXe0PLEYDELavugPw5OxYlvXvME0zGwOmVruhA/s320/mbtloading.gif') no-repeat left center;
width: 16px;
height: 16px;
}.viewscount {
float: right;
color: #EE5D06;
font: bold italic 14px arial;
}.views-text {
float: left;
font: bold 12px arial;
color: #333;
}.views-icon{
background: url('https://blogger.googleusercontent.com/img/b/R29vZ2xl/AVvXsEiVzAY0lihZwFOEiiFiUpxGTqXjuBSdHWVu_rivq0t1AfdQPwP7SiqbK2RFF_aTK-ew_RjU3m-dgcZC4mjzaZ3SXw9J794pBNDQfjDGND0axHO3giWm8jnFr40Mlf1X6C_20O5vODBfZ95m/s1600/postviews.png') no-repeat left;
border: 0px;
display: block;
width: 16px;
height: 16px;
float: left;
padding: 0px 2px;
}
6. Customization:
Go here Next tutorial plz click here
Congratulation! You have successfully installed and enjoy cheers:)
Credits
I am heartily respect full Mohammad Mustafa at MBT who share tutorial for us. This tutorial first generated by him. he put the efforts and debug this script. i am very thanks full to MBT. My favorite and great full person in blogging Mohammad Mustafa.

This plugin is very amazing. I have also tested it on one of my demo blogs. And it really works fine. :)
ReplyDelete@ oh great Ankit kumar
ReplyDelete